Sweet Potato Pancakes

Pancakes are a very famous breakfast dish, eaten all around the world with different names in different places. Today’s recipe is not of a very traditional way of pancake but it is quite healthy as well. This is a very easy recipe with just few known ingredients which are easily available in Indian markets.

ed2

Now let’s jump into the recipe without much talking.

(Serves 3 to 4 people)
Ingredients:

3-4 medium sized sweet potatoes
150 g self-rising flour( may be 1cup)
2 large eggs
1 tsp bi-carb (baking soda)
4-5 green chilies
1 medium sized onion
1 tsp sugar
1 cup cold milk
Refined oil to fry (as needed)
Salt to taste
Spring onion to garnish

Method:
First of all, prep all the things beforehand as the actual cooking process is hardly 10 min. Boil the sweet potatoes until soft and squishy. Rest them aside and let it cool completely (cooling it completely is necessary because the heat through it can pass on to the eggs when we mix it and may cook the egg which should be avoided). Finely chop the onion and green chilies, set aside. Peel off the potatoes when cooled. The prep is done!!! As it is so hassle-free, any amateur cook can try it.

Take a big bowl (make sure that you can whisk in it properly without any mess!!) and mash the potatoes coarsely. Put all the flour into the mashed potatoes and try to mix them lightly. Put the eggs 1 at a time and whisk the mixture until all the eggs mix completely. Now the mixture will get a batter-like consistency. Add the chopped onion and chilies, keep whisking, add salt and sugar as well. If you feel like the batter is tight and not enough fluffy add milk. You should keep in mind to add milk 1 tbsp at a time so that the batter becomes loose but not runny. As the batter has the potatoes, it won’t be same as a regular pancake batter. It will be more thick and lumpy. At last add the bi-carb and whisk it for one last time.

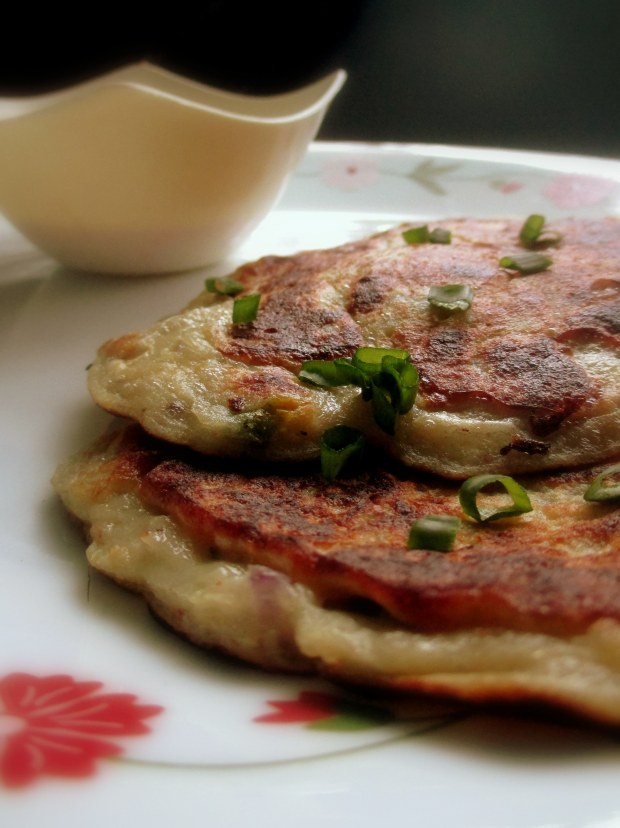
Heat a pan on medium high heated stove. Lightly oil the pan or spray some cooking oil. Take a large rice spoon or ladle for the pancake size whichever is preferable. Pour the pancake batter into the pan in batches. Flatten each pancake with a spatula. Brown them on each side for about 2-3 min. Garnish well with chopped spring onions and serve them hot with ketchup. Enjoy this low-fat recipe guilt-free!!!

ed4

Sharing some thoughts

Food is something which connects the whole world irrespective of our nationality,religion or caste. I am an Indian, born under a hindu family and Bengali by caste. Let me share something -Bengalis are lovers of food,travel and politics and i am no different. Maa is an excellent cook and my inspiration. I don’t remember the exact sentence but once i heard Gordon Ramsay said that our love for food and passion comes from our childhood and from the food we eat. From the memories we share with our family during a feast or a celebration through food that is what we cherish for rest of our lives. No matters where we live or what we are, this feelings and memories are same for everyone in any corner of this world. I love food ,and i love every bit of it.. from growing a chilli to cooking it. I know it’s sounds weird but i know i am sharing every food lovers happiness of going into a market with stock of fresh colourful veggies and beautiful produce. Food is a celebration of all the love mother nature gives us and we should respect that with care and love.

When I was into the phase of liking food and cooking I came across so many beautiful cooking, techniques, cuisines, tools and so many great chefa. I came to know how this great chefs respects the produce and try to do justice with them. One of the most favourite shows of mine is Masterchef Australia,no offence to others but i love the show even more than the Indian version. The show taught me that there are so many techniques, different cuisines and yes obviously i came to know about so many different ingredients which i don’t get here in India. I shared this just to say that food is something which makes me happy and i want to share my happiness with not only my family but the rest of the world as well. Wanted to start a food blog for so long and here it is ,finally.Just wanted to share this feelings and nothing more .

Chocolate Mousse

Everyone loves chocolates (at least people I know does)!! So today lets make something decadent and luxurious and seductive and what not! 
Sharing a very easy and different chocolate mousse recipe to enjoy every bit of yummy Sunday.

(Serves 3 -4 people) 
Ingredients:
40 g Dark Chocolate (55%)
50-60 ml Heavy Cream
8 Oreo biscuits
80 ml Whole Milk
1 tsp Powdered Gelatin
10 g Powdered Sugar (optional)

Method:
First take one third of the milk and mix the powdered gelatin in it. Keep it aside for 10 minutes to bloom.
Put away a little bit of chocolate for later and shred or finely chop the rest of the chocolate.
Take the rest of the milk in a microwave-bowl and add the shredded chocolate. Microwave this for 30 s to 1 min. Keep a keen eye on it as the chocolate shavings melt. Do not overheat the milk.
Take it out and add the gelatin-milk mixture in it. Keep stirring until there remains no lump. You can add a bit sugar at this stage if you want it not to be too bitter. But I would suggest not to as that really lifts the richness of the dish. Keep this aside to cool down.
Now take the heavy cream and beat it until it it forms soft peaks.

Separate the biscuits and cream of the Oreo biscuits. Crush the biscuits into fine crumbs. add 1 tsp of the whipped cream to the crumbs and kneed it. 
Take one tsp of whipped cream at a time and add it to the chocolate mix. Also add the cream from the biscuits. You can also add 1 tsp of coffee to this for a nice kick. Keep mixing until there remains no white trace of the whipped cream.
And now it’s assemble time. Take any dessert bowl of your choice and first set the base of the Oreo crumbs. push it down properly until the base is covered with a tight layer of it now slowly pour the mousse mixture over.
Put it in the freezer for 3-4 hours or until your mousse is set.

IMG_20190327_003117

Go wild while serving it with extra crumbs, cream and chocolate. Serve immediately. Enjoy with pajamas and movies.

Jungli Maas/Gosht

Jungli Maas/Gosht is a rajasthani non-veg dish, more than 100 yr old recipe which was prepared while the Rajputs were on wars for days. They could not take too much ingredients with them for cooking so they kept simple spices like coriander seeds, fennel seeds etc . They use to hunt and cook their meat on their way from one place to another.

This particular dish is very simple to make with just few spices (unlike other Indian meat dishes) and is filled with so much flavor and beautiful aroma that makes you feel like royalty.ed3

Let’s jump into the recipe now…

(Serves 6 to 7 people)
Ingredients:
1 kg mutton/any red meat
100 g mustard oil
2 tbsp clarified butter (ghee)
50 g garlic (whole)
4-5 cloves of garlic
50 g whole fennel seed (saunf)

100 g curd
10 g dried red chilies (whole)
1 tbsp red chili powder
1 tbsp turmeric powder
1 tsp sugar
3-4 bay leaves
25 g watermelon/magaj seeds (optional)
Salt to taste

Method:
Lets prep all things before starting the actual cooking. Make paste of the whole garlics. Now keep aside about(need not to be precise) 10 g of fennel seeds. Soak the rest of fennel seeds, dried red chilies and watermelon seeds in different bowls at least for 1 hr. After that grind all of them separately and keep aside.
Put the mutton in a pressure cooker and pour water onto the meat until it’s 1 inch above meat. While pressure cooking we want maximum flavor to enter into the meat. So put 2 bay leaves, 4-5 crushed garlic cloves, crush the fennel seeds which was kept aside, 1/2 tbsp turmeric powder and salt to taste. Mix them well into the water along with the meat and put the lid on.
Give two whistle to make the meat tender. If you feel the meat is not cooked enough you can give one or more whistle accordingly. Once done, keep aside.
We have our meat and all ingredients all prepared so its time for the royal cooking.
Take a large nonstick kadai/cooking pot. Heat the oil and ghee together into the kadai. Put the bay leaves into the oil and saute it for 20 sec. Add the garlic paste and fennel seeds paste together into the oil. Saute them until brown for 10 min keeping the heat medium to low. Now add the red chilli paste, turmeric powder and red chili powder into the sauteed paste and stir. Add the curd and saute well for 10 min. Add salt and sugar to taste and saute again for another 5 min. Notice as the oil starts living the paste and the color of the paste changes. It will be darker in color.
Add the pressure cooked mutton to the paste and stir all the ingredients together. While doing this please make sure the gas is on high. Cook the mutton for another 10 min and keep an eye to the bottom of the kadai. The gravy can dry up quickly and stick to the bottom. While we saute the mutton, heat up the stock left inside the pressure cooker as it is needed to be added into the mutton slowly when the mutton starts sticking to the kadai. Take one cup of the juice and add it to the mutton, keep on stirring for 10 min. Then, put the gas on low flame, add the watermelon seed paste and stir well. The gravy will thicken and color will change to bright reddish orange. The aroma of garlic and fennel will make every foodie hungry.

The best things takes a little time. So the total preparation and cooking time takes near about 1 hr and 20 min. But believe me, it’s worth your time.

Now  put some more of the stock (like 1 cup or so, according to your preference/liking of thickness of the gravy)  into the mutton to make a semi-thick gravy. Put the lid on and cook the meat for 10 min on low flame. Turn off the gas.

ed1

Serve with roti, paratha or even hot white rice and feel the royalty.

Kesar Malai Kulfi

Let’s get started with something sweet and loved by every Indian out there….

(Serves 6 to 8 people)
Ingredients:
1 L full-fat milk
250 g dry milk( i.e khoya kheer / mawa)
200 g granulated sugar
50 g mixed dry fruits (cashew, almond, pista, raisin and black currents)
3-4 strands of saffron
4-5 cardamom pods
1 tsp of corn flour (My secret ingredient for smoother and creamier indulgence)
1 tbsp rose water
2-3 rose petals

Method:

In a large saucepan pour the milk and bring it to boil. Keep an eye on it as everyone knows how it can betray you and overflow, just when you took the eye off (ha ha ha).
Grate the mawa/khoya and keep it aside. Finely chop all the dry fruits and rose petals as well. Take 2 -3 teaspoon of hot milk in a cup and soak the saffron strands into it. Crush the cardamom pods and keep it aside as well.
Make a corn flour slurry with the taken corn flour and half cup of water.All the preps are done so Let’s go back to our mighty milk. When the milk come up to boil, put the gas on seam.
Mix the sugar and grated mawa / khoya into the milk and start stirring continuously so that everything mixes well and there are no lumps into the milk.
Stir it at least for 10 min and then add all the chopped up dry fruits. This time you will notice that the mixture is reducing slowing and starting to thicken a bit.
Please keep the gas on seam this whole time as working with milk can be tricky, it can overflow anytime.
Now in the mixture add the soaked saffron and cardamom pods for the color and flavor. You will see the magic now – the tint of yellow diffusing into the milk and smell of cardamom lingering your kitchen.That’s the moment you know something tasty is on the way.
Reduce the mixture to half of initial volume with continuous stirring. It takes about 10 to 15 min on seam to reduce.
Now put the corn flour slurry into the mixture and stir slowly and mix until the mixture starts to thicken more. Make sure there are no lumps. Tip: use a beater. It will help to get rid of lumps (if any) and thicken you mixture quickly.
Stirring for 3 min will ensure enough thickened kulfi. So turn off the gas and wait for it to cool down.
When the kulfi is lukewarm, add chopped rose petals and rose water. Mix well and let it cool completely into room temperature. Once it cooled, pour into kulfi molds or just into a container and put it in the freezer.
I will recommend a container as you can churn your kulfi time to time (Churning is the process of scrapping and shaking up cream/ice creams or whole milk to make something smoother/creamier). Try to churn the kulfi at least twice in gaps of 4 hr so that your kulfi becomes smoother and creamier, more like a ice cream rather than the typical icy-hard kulfi.


Serve when it’s frozen!!!.